emonHub Configuration File
Overview
emonHub is configured via the emonhub.conf config file. On the emonPi & emonBase this file is located in /etc/emonhub/emonhub.conf.
emonCMS inputs not updating?
When making changes to the configuration, the emonhub service should always be restarted and the log checked for errors.
Editing the emonHub configuration file
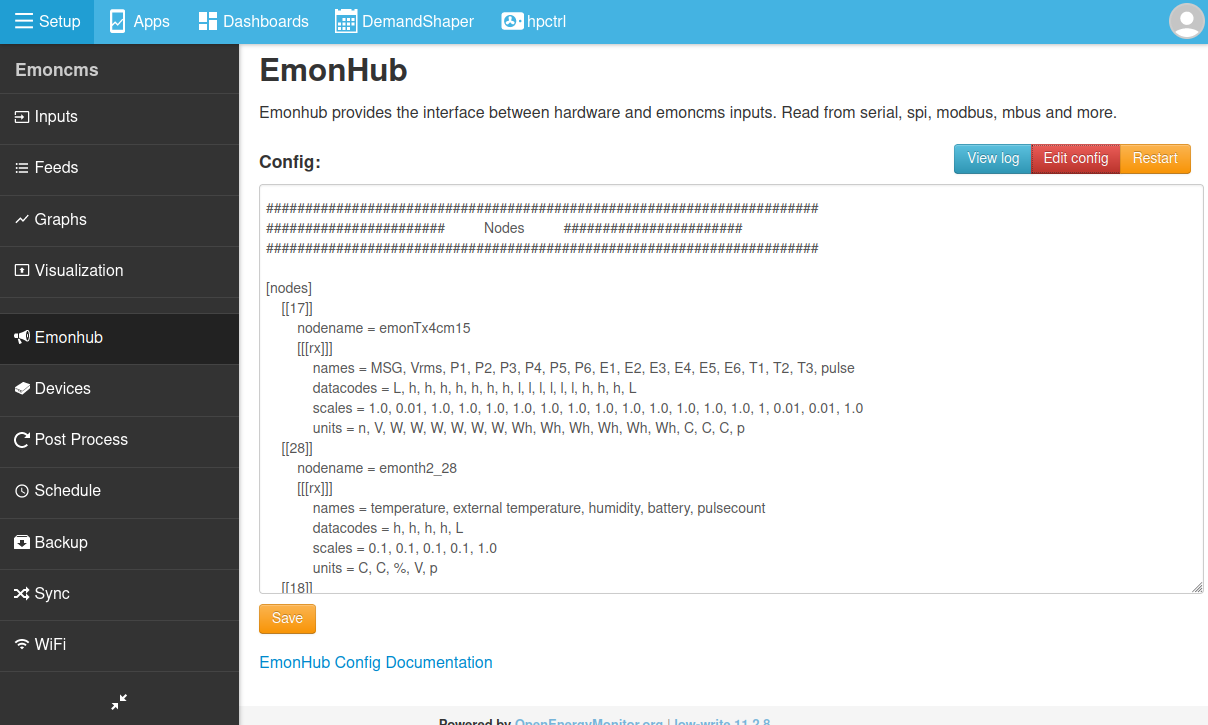
For users with an emonPi/emonBase or RaspberryPi running emonSD, emonHub can be configured from within emonCMS. Navigate to Setup > EmonHub > Edit Config:
Alternatively the emonHub configuration can be edited in the config file directly via command line:
nano /etc/emonhub/emonhub.conf
In most cases, EmonHub will automatically update to use the latest configuration. If a change does not update, emonHub can be restarted either by clicking on ‘Restart’ on the emonCMS > EmonHub page, or by restarting via command line:
sudo systemctl restart emonhub
Configuration file Structure
emonhub.conf has 3 sections:
#######################################################################
#######################    emonHub  settings    #######################
#######################################################################
[hub]
### loglevel must be one of DEBUG, INFO, WARNING, ERROR, and CRITICAL
loglevel = DEBUG

### Autoconf is used to automatically add node decoders
### If you have unknown nodes appearing disable this feature
### Make sure to restart emonHub after changing this
autoconf = 1

#######################################################################
#######################       Interfacers       #######################
#######################################################################
[interfacers]

#######################################################################
#######################          Nodes          #######################
#######################################################################
[nodes]
1. [Hub]
Hub is a section for emonhub global settings such as the loglevel.
2. [Interfacers]
The Interfacers section holds the configuration for the different interfacers that emonhub supports.
Interfacers are often hierarchical, so inherit settings and options from a parent Interfacer.
3. [Nodes]
The Nodes section holds the decoder configuration for rfm12/69 node data which are sent as binary structures.
1. [Hub] Configuration
The hub configuration should be self explanatory. Emonhub log can be viewed in the Setup > EmonHub section of local Emoncms on an emonPi / emonBase. Default settings are:
### loglevel must be one of DEBUG, INFO, WARNING, ERROR, and CRITICAL
loglevel = DEBUG

### Uncomment this to also send to syslog
# use_syslog = yes

### Autoconf is used to automatically add node decoders
### If you have unknown nodes appearing disable this feature
### Make sure to restart emonHub after changing this
autoconf = 1
2. [Interfacers] Configuration
The settings for a particular interfacer are largely unique to that interfacer except for the pubchannel and subchannel which are common to all.
Each interfacer has a unique name between the first set of double brackets [[xxx]]. This can be anything and will then be seen in the log file. An Interfacer can be declared twice (such as the MQTT Interfacer to send data to 2 different brokers).
The Type setting corresponds to the interfacer file name as found in src/interfacers/ directory.
[[[init_settings]]] are settings used by the interfacer on setup. These are usually defined in the header of the interfacer file. If changed, the emonHub service must be restarted.
[[[runtime_settings]]] are other settings for the interfacer. The first setting in this group must be either pubchannels or subchannels and must end with a comma. There must be a blank line between this and subsequent settings.
The remaining options are optional and if not specified will fall back to the interfacer defaults.
3. [Nodes] Configuration
The final part of the emonhub.conf configuration concerns decoding of RFM12 and RFM69 nodes. The data in encoded before transmission and the received data must therefore be ‘decoded’ i.e. converted from a raw datacode to recgonisable values.
Here’s an example of what this section looks like from the default emonpi emonhub.conf. The rest of this readme explains what each line means and how to write your own node decoders or adapt existing decoders for new requirements.
    #######################################################################
    #######################          Nodes          #######################
    #######################################################################

    [nodes]

    ### List of nodes by node ID
    ### 'datacode' is default for node and 'datacodes' are per value data codes.
    ### if both are present 'datacode' is ignored in favour of 'datacodes'.
    ### e.g. node 99 would expect 1 long and 4 ints, unless the "datacodes" line
    ### was removed, then "datacode" would make it expect any number of longs.
    ### Likewise per value "scales" will override default node "scale"

    [[5]]
    nodename = emonPi
    firmware = emonPi_RFM69CW_RF12Demo_DiscreteSampling.ino
    hardware = emonpi
    [[[rx]]]
        names = power1,power2,power1_plus_power2,Vrms,T1,T2,T3,T4,T5,T6,pulseCount
        datacodes = h, h, h, h, h, h, h, h, h, h, L
        scales = 1,1,1,0.01,0.1,0.1,0.1,0.1,0.1,0.1,1
        units = W,W,W,V,C,C,C,C,C,C,p
Tip
Autoconf is enabled as standard and is used to automatically add node decoders from a known list of common packet lengths and nodeid’s.
If you have unknown nodes appearing Turn off autoconf at the top of emonhub.conf (set autoconf = 0) and restart emonHub. Remove the unknown nodes, keep only the nodes that you wish to keep.
Unknown nodes can also be cleared in emoncms with the following URL:
https://emoncms.org/device/clean.json
http://emonpi.local/device/clean.json
NodeID
[[10]]
A numeric NodeID. This identifies the node to emonHub. Every node within your system MUST have a unique ID. There may be only one definition for each NodeId. The NodeID is programmed into the node firmware, either in the sketch and/or by switches.
nodename
nodename =
A text string, for your benefit in identifying each node. This field is optional.
MQTT: The nodename can be used with the MQTT interfacer to send topics of the form nodes/nodename/variablename.
rx
[[[rx]]]
This must be “rx” and specifies that the next section is for the config of the sensor values received from a node. Its also possible to define a “tx” section for variables to be sent to the node such as control state’s.
tx
[[[tx]]]
It’s possible to transmitt data to other nodes via RFM e.g. the following config
    [[[tx]]]
        names=nodeid,hour,minute,second,utilityW,solarW,utilityKwh,solarKwh
        datacodes =b,b,b,h,h,H,H
        units = h,min,sec,W,W,kwh,kwh
The following data published to MQTT
emonhub/tx/20/values/14,38,34,700,138,2700,829
Will result in the follwing data being transmitted via RF in JeeLib packet formatt:
14,38,34,700,138,2700,829
To decode the RFM data use the following struct in the receiver node, emonGLCD in this example:
typedef struct {
  byte nodeId ;
  byte hour, min, sec ;
  int utilityW, solarW, utilityKwh, solarKwh;
} PayloadTX;
Datacodes
An un-configured Emonhub will by default assume that RFM12 or RFM69 data packets received are a series of integers, each 2 bytes long (when using the Jee interfacer). The radio packet format is quite minimal and non-descriptive and so emonhub doesn’t know how to decode the packets from the received data if the packet structure is any different.
Earlier OpenEnergyMonitor nodes always sent a series of integers and so no decoder configuration was needed, more recent revisions now include the sending of pulse counts or watt hours which would overrun the maximum value that can be sent as an integer. The latest EmonPi, EmonTx3 and EmonTH firmware’s all send pulse count as long datatypes at the end of their packets, taking up 4 bytes.
Its possible to decode any radio packet that is packed as a binary structure with Emonhub. For example if we look at the relevant part of the node decoder for the emontx v3 we can see 11 integers (h) and one unsigned long at the end (L)
[[8]]
    [[[rx]]]
        datacodes = h,h,h,h,h,h,h,h,h,h,h,L
The node decoder could be left like this if we only wanted to decode the packet structure correctly. Alternatively, if the packet structure is a series of integers its possible to write:
[[1]]
    [[[rx]]]
        datacode = h
Notice that the name is datacode rather than datacodes with an s. There are 13 different datatypes that can be decoded:
    b: byte, 1 byte
    h: short integer, 2 bytes
    i: integer, 4 bytes
    l: long, 4 bytes
    q: long long, 8 bytes
    f: float, 4 bytes
    d: double, 8 bytes
    B: unsigned byte, 1 byte
    H: unsigned short integer, 2 bytes
    I: unsigned integer, 4 bytes
    L: unsigned long, 4 bytes
    Q: unsigned long long, 8 bytes
    c: char, 1 byte
datacode = 0 is a valid datacode. It is best remembered by thinking of it as either “0 = False” (no decoding) or “Zero decoding required”; in code it is a logical test as to whether to continue, or bypass, decoding the value(s).
Note: A datacode can also be set in the runtimesettings of any interfacer; e.g. if you added datacode = h to the serial or socket interfacers, that would mean if the datacode(s) line is omitted from the nodes section, it will default to “h” rather than the hardcoded default of “0”.
Names
It’s possible to specify sensor value names to help with identification. The emoncms nodes module can also load these names for its node list. Another possibility not yet implemented, is to use these names to publish sensor values to MQTT topics of the form nodes/emontx/power1.
[[8]]
    [[[rx]]]
        names = power1, power2, power3, power4, Vrms, temp1, temp2, temp3, temp4, temp5, temp6, pulse
        datacodes = h,h,h,h,h,h,h,h,h,h,h,L
Scales
In order to keep radio packet length small, a sensor value measured as a float on an emontx or emonth (e.g. temperature) is first multiplied by 10 or 100, then sent as a 2-byte integer in the radio packet, then scaled back to the original value on receipt in emonhub. This saves 2 bytes per sensor value and provides a convenient way of providing 1 or 2 decimal place resolution.
The scales to be applied can be specified for each sensor value as in this example for the emontx:
[[8]]
    [[[rx]]]
        names = power1, power2, power3, power4, Vrms, temp1, temp2, temp3, temp4, temp5, temp6, pulse
        datacodes = h,h,h,h,h,h,h,h,h,h,h,L
        scales = 1,1,1,1,0.01,0.1,0.1,0.1,0.1,0.1,0.1,1
In this example, the RMS Voltage is multiplied by 0.01, and temperature values by 0.1. Which means the RMS voltage was multiplied by 100 and the temperature value(s) by 10, on the emontx.
or a single scale can be applied (note scale instead of scales with an s)
[[8]]
    [[[rx]]]
        datacodes = h,h,h,h,h,h,h,h,h,h,h,L
        scale = 1
The default scale value is 1, so where no scaling is needed, this line can be left out of the configuration.
The latest version of the emon-pi variant of emonhub does not require the number of scales to match the number of variables, it will scale according to the scales available or scale by 1 if scales are not available.
Units
A comma-separated list of engineering units to describe the data. Common units are W, kW, V, A, C, %. These are only to help with identification. The are currently used in the emoncms nodes module UI.
[[8]]
    [[[rx]]]
        names = power1, power2, power3, power4, Vrms, temp1, temp2, temp3, temp4, temp5, temp6, pulse
        datacodes = h,h,h,h,h,h,h,h,h,h,h,L
        scales = 1,1,1,1,0.01,0.1,0.1,0.1,0.1,0.1,0.1,1
        units =W,W,W,W,V,C,C,C,C,C,C,p
Standard node decoders
The following lists the standard node decoders for recent versions of the EmonPi, EmonTx v3, EmonTH and EmonTxShield. These are currently included in emonhub.conf and provide automatic decoding of node data.
If you upload firmware to any of these nodes, and wish to have the data decoded with names, units, and scaled correctly, these are the decoders for the standard firmware. The node decoders are also included at the top of each firmware file for reference.
emonTx4
Copied here for reference:
[[17]]
    nodename = emonTx4_17
    [[[rx]]]
        names = MSG, Vrms, P1, P2, P3, P4, P5, P6, E1, E2, E3, E4, E5, E6, T1, T2, T3, pulse
        datacodes = L, h, h, h, h, h, h, h, l, l, l, l, l, l, h, h, h, L
        scales = 1.0, 0.01, 1.0, 1.0, 1.0, 1.0, 1.0, 1.0, 1.0, 1.0, 1.0, 1.0, 1.0, 1.0, 0.01, 0.01, 0.01, 1.0
        units = n, V, W, W, W, W, W, W, Wh, Wh, Wh, Wh, Wh, Wh, C, C, C, p
The emonTx4 may also be configured via the DIP switch on the board to transmit on node 18. If you have two or more emonTx4 units, make multiple copies of this node decoder and adjust the nodeid’s in the decoder appropriately.
EmonPi
Copied here for reference:
[[5]]
    nodename = emonPi
    [[[rx]]]
        names = power1,power2,power1_plus_power2,Vrms,T1,T2,T3,T4,T5,T6,pulseCount
        datacodes = h, h, h, h, h, h, h, h, h, h, L
        scales = 1,1,1,0.01,0.1,0.1,0.1,0.1,0.1,0.1,1
        units = W,W,W,V,C,C,C,C,C,C,p
EmonTx v3.4 DS Firmware V2.3+
Node ID when DIP switch1 is off = 8, node ID when DIP switch1 is on is 7
Copied here for reference:
[[8]]
    nodename = emonTx_3
    [[[rx]]]
        names = power1, power2, power3, power4, Vrms, temp1, temp2, temp3, temp4, temp5, temp6, pulse
        datacodes = h,h,h,h,h,h,h,h,h,h,h,L
        scales = 1,1,1,1,0.01,0.1,0.1, 0.1,0.1,0.1,0.1,1
        units =W,W,W,W,V,C,C,C,C,C,C,p
EmonTx v3.4 DS Firmware 1.6+
EmonTx v3 (emonTxV3_4_DiscreteSampling.ino, v1.6+) Firmware Location
Can be on either nodeid 10 or 9
[[10]]
    nodename = emonTx_1
    [[[rx]]]
        names = power1, power2, power3, power4, Vrms, temp1, temp2, temp3, temp4, temp5, temp6, pulse
        datacode = h
        scales = 1,1,1,1,0.01,0.1,0.1, 0.1,0.1,0.1,0.1,1 #Firmware V1.6
        units =W,W,W,W,V,C,C,C,C,C,C,p
EmonTx v3, emonTxV3_4_DiscreteSampling.ino, < V1.4
[[10]]
    nodename = emonTx_1
    [[[rx]]]
        names = power1, power2, power3, power4, Vrms, temp
        datacode = h
        scales = 1,1,1,1,0.01,0.1
        units =W,W,W,W,V,C
EmonTH V2
EmonTH V2 Firmware location
Standard nodeid’s: 23, 24, 25 & 26 depending on DIP switch positions:
[[23]]
    nodename = emonTH_5
    [[[rx]]]
        names = temperature, external temperature, humidity, battery, pulseCount
        datacodes = h,h,h,h,L
        scales = 0.1,0.1,0.1,0.1,1
        units = C,C,%,V,p
EmonTH V1, emonTH_DHT22_DS18B20_RFM69CW.ino v1.5 -> v1.6.1
emonTH V1 Firmware location
Standard nodeid’s: 19, 20, 21 & 22 depending on DIP switch positions:
[[19]]
    nodename = emonTH_1
    [[[rx]]]
        names = temperature, external temperature, humidity, battery
        datacode = h
        scales = 0.1,0.1,0.1,0.1
        units = C,C,%,V
EmonTx Shield
EmonTX Shield Firmware location
[[6]]
    nodename = emonTxShield
    [[[rx]]]
        names = power1, power2, power3, power4, Vrms
        datacode = h
        scales = 1,1,1,1,0.01
        units =W,W,W,W,V
Troubleshooting
Node data inactive or, node data does not appear for a configured node
Try replacing the datacodes = h,h,h,h,… line with datacode = h (note: datacode without an s). This will decode most of the radio packet content for the standard OpenEnergyMonitor emontx,emonth and emonpi firmwares, including historic versions.
The data still does not appear on the nodeid I expect
Both the EmonTx and EmonTH nodes have switches on their circuit boards to enable changing nodeIDs without the need to reprogram the device. Depending on the switch positions and firmware version, the EmonTx v3 can be assigned nodeID 7,8,9 or 10. The EmonTH can be assigned nodeID 19,20,21,22,23,24,25 or 26.