emonHub Interfacers
To configure emonHub interfacers edit emonhub.conf which can be done via the emonHub section of Emoncms web UI or by editing the config file directly /etc/emonhub/emonhub.conf
List of Interfacers - (Links to GitHub)
For a full list of interfacers, view GitHub source https://github.com/openenergymonitor/emonhub/tree/master/src/interfacers. A number of these interfacers are not maintained and may not have been updated to work with Python3.
Links to interfacer specific readmes in /conf/interfacer_examples
OEM Interfacer (A more flexible version of the Jee, EmonTx3 and space separated serial interfacer)
TCP Modbus interfacer e.g Fronius Inverters (added by @cjthuys)
Using emonHub
Examples of using emonHub for specific purposes.
Important: ensure there is no conflic of ttyUSB ports between emonHub interfacers e.g by default there is a EmonOEMInterfacer which reads from ttyUSB0 which is used to read data from emonTx V4 if connected via USB, this interfacer will need to be removed to allow another interfacer eg SDM120 / MBUS etc to read from ttyUSB0
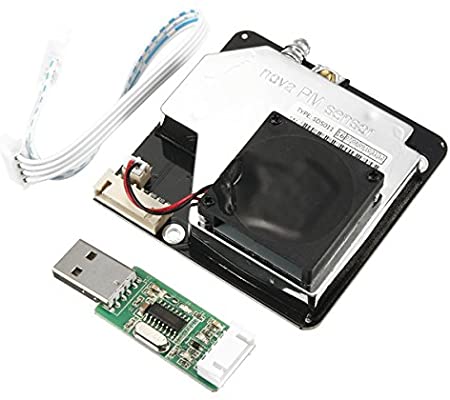
SDS011 Air-Quality sensor
1. Plug the SDS011 sensor into a USB port on either the emonPi or emonBase.
2. Login to the local copy of Emoncms running on the emonPi/emonBase and navigate to Setup > EmonHub. Click on ‘Edit Config’ and add the following config to the interfacers section to enable reading from the SDS011 sensor:
readinterval: Interval between readings in minutes, it is recommended to read every 5 minutes to preserve sensor lifespan.
Example SDS011 EmonHub configuration:
[[SDS011]]
    Type = EmonHubSDS011Interfacer
    [[[init_settings]]]
        com_port = /dev/ttyUSB0
    [[[runtimesettings]]]
        readinterval = 5
        nodename = SDS011
        pubchannels = ToEmonCMS,
3. The SDS011 readings will appear on the Emoncms Inputs page within a few minutes and should look like this:
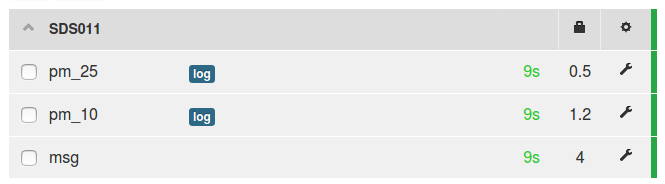
Tip: When logging the SDS011 inputs to feeds, make sure to set the feed interval to match the sensor readinterval, e.g select 5 minutes if readinterval is set to 5.
Modbus Electric Meters
SDMXXX
V = Voltage (Neutral to phase) (VRMS) P = Power (W) I = Current (A) EI = Energy Imported (kWh) EE = Energy Exported (kWh) VA = Volt Amps (VoltAmps) RI = Reactive Power (VArh) FR = Frequency (Hz)
A number next to the referance denoates a phase e.g P1 is power in phase 1
SDM120 and SDM230 single-phase
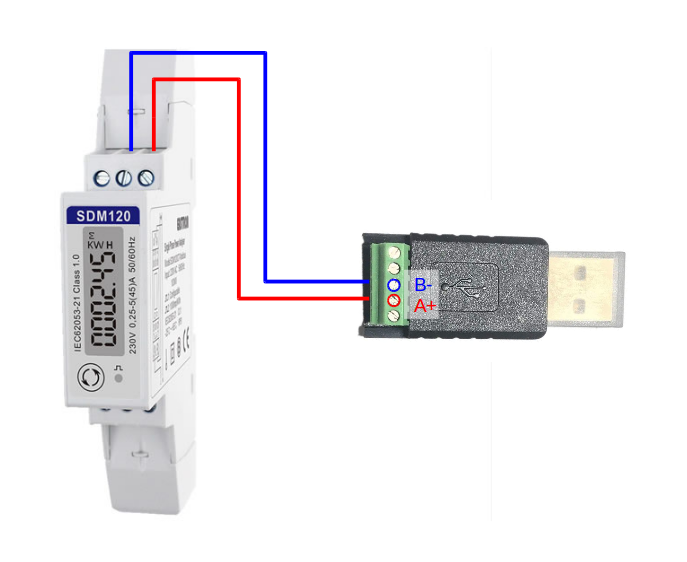
The SDM120-Modbus-MID and SDM230 are single phase electricity meter provides MID certified electricity monitoring up to 45A or 100A, ideal for monitoring the electricity supply of heat pumps and EV chargers. A USB to RS485 converter is needed to read from the modbus output of the meter.The SDM120 / SDM230 meter comes in a number of different variants, be sure to order the version with a modbus output (SDM120-MBUS-MID).
1. Connect up the USB to RS485 converter to the modbus output of the SDM120 meter and plug the converter into a USB port on either the emonPi or emonBase.
2. Login to the local copy of Emoncms running on the emonPi/emonBase and navigate to Setup > EmonHub. Click on ‘Edit Config’ and add the following config to the interfacers section to enable reading from the SDM120 meter:
read_interval: Interval between readings in seconds
Example single SDM120 / SDM230 EmonHub (V2.3.4+) configuration:
[[SDM120]]
    Type = EmonHubMinimalModbusInterfacer
    [[[init_settings]]]
        device = /dev/ttyUSB0
        baud = 2400
    [[[runtimesettings]]]
        pubchannels = ToEmonCMS,
        read_interval = 10
        nodename = sdm120
        # prefix = sdm_
        [[[[meters]]]]
            [[[[[sdm120]]]]]
                address = 1
                registers = 0,6,12,18,30,70,72,74,76
                names = V,I,P,VA,PF,FR,EI,EE,RI
                precision = 2,3,1,1,3,3,3,3,3
EmonHub (V2.3.4+) can also possible to read data from multiple SDM120 modbus meters, each meter will need an unique modbus ID, this ID can be set using the push button menu on the SDM120. Example emonhub config multiple SDM120 EmonHub configuration:
[[SDM120]]
    Type = EmonHubMinimalModbusInterfacer
    [[[init_settings]]]
        device = /dev/ttyUSB0
        baud = 2400
    [[[runtimesettings]]]
        pubchannels = ToEmonCMS,
        read_interval = 10
        nodename = sdm120
        # prefix = sdm_
        [[[[meters]]]]
            [[[[[sdm120a]]]]]
                address = 1
                registers = 0,6,12,18,30,70,72,74,76
                names = V,I,P,VA,PF,FR,EI,EE,RI
                precision = 2,3,1,1,3,3,3,3,3
            [[[[[sdm120b]]]]]
                address = 2
                registers = 0,6,12,18,30,70,72,74,76
                names = V,I,P,VA,PF,FR,EI,EE,RI
                precision = 2,3,1,1,3,3,3,3,3
Here’s a cut down interfacer which just reads Power and Energy imported:
    [[SDM120]]
        Type = EmonHubMinimalModbusInterfacer
        [[[init_settings]]]
            device = /dev/ttyUSB0
            baud = 2400
        [[[runtimesettings]]]
            pubchannels = ToEmonCMS,
            read_interval = 10
            nodename = sdm120
            [[[[meters]]]]
                [[[[[electric]]]]]
                    address = 1
                    registers = 12, 72
                    names = Power, Energy
                    precision = 1, 3
3. The SDM120 readings will appear on the Emoncms Inputs page within a few seconds and should look like this:
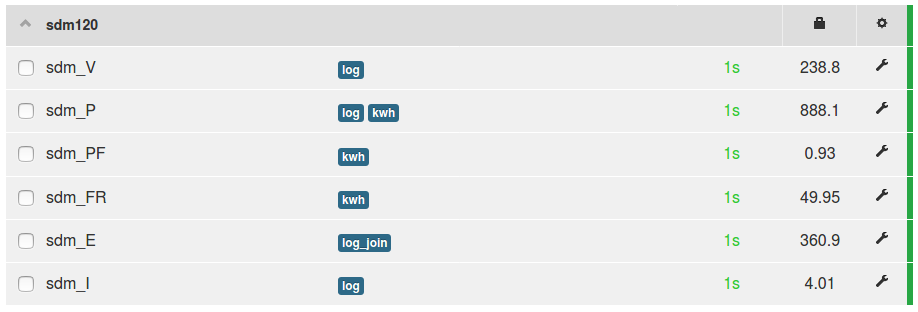
Tip: When logging the cumulative energy output (sdm_E) to a feed, use the ‘log to feed (join)’ input processor to create a feed that can work with the delta mode in graphs. This removes any data gaps and makes it possible for the graph to generate daily kWh data on the fly.
SDM630 and SDM72D Three-phase
Default config to read from SDM630 and SDM72D Modbus three-phase 100A meter, see datasheet for full register list, convert hex register to decimal before inserting into emonhub.conf
[[SDM630]]
    Type = EmonHubMinimalModbusInterfacer
    [[[init_settings]]]
        device = /dev/ttyUSB0
        baud = 9600
    [[[runtimesettings]]]
        pubchannels = ToEmonCMS,
        read_interval = 10
        nodename = SDM630
        [[[[meters]]]]
            [[[[[electric]]]]]
                address = 1
                registers = 0,2,4,52,12,14,16,72,90,92,94,74,68,68,99,6,8,10
                names = V1,V2,V3,P_total,P1,P2,P3,EI_total,EI1,EI2,EI3,EE_total,EE1,EE2,EE3,I1,I2,I3
                precision = 2,2,2,1,1,1,1,3,3,3,3,3,3,3,3,3,3,3
Rayleigh RI-D35-100
EmonHub can read from a Rayleigh RI-D35-100 single-phase 100A electricity meter via modbus using the following config:
[[modbus]]
    Type = EmonHubMinimalModbusInterfacer
    [[[init_settings]]]
        device = /dev/ttyUSB0
        baud = 9600
    [[[runtimesettings]]]
        pubchannels = ToEmonCMS,
        read_interval = 10
        nodename = electricity
        # prefix = sdm_
        [[[[meters]]]]
            [[[[[ri-d35-100]]]]]
                address = 1
                registers = 3,5,15,19,23,21,27
                names = EI,EE,P,VA,I,V,FR,PF
                precision = 1,1,1,2,2,1,2
                scales = 1,1,1000,1,1,1,1
Rayleigh RI-D150
EmonHub can read from a Rayleigh RI-D150 three-phase electricity meter via modbus using the following config:
[[RI-D150]]
    Type = EmonHubMinimalModbusInterfacer
    [[[init_settings]]]
        device = /dev/ttyUSB0
        baud = 9600
        parity = even
        datatype = float
    [[[runtimesettings]]]
        pubchannels = ToEmonCMS,
        read_interval = 10
        nodename = electricmeter
        [[[[meters]]]]
            [[[[[electric1]]]]]
                address = 1
                byteorder = 3
                registers = 0, 2, 4, 16, 18, 20, 42, 88, 90, 54
                names = V1, V2, V3, I1, I2, I3, Total_Power, Import_kWh, Export_kWh, PF
                precision = 2, 2, 2, 2, 3, 3, 3, 3, 3, 3
                scales = 1, 1, 1, 1, 1, 1, 1000, 1, 1, 1
Eaton EPBMETER1
EmonHub can read from a Eaton EPBMETER1 three-phase panel-mount electricity meter via modbus using the following config:
[[EPBMETER1]]
        Type = EmonHubMinimalModbusInterfacer
        [[[init_settings]]]
            device = /dev/ttyACM*
            baud = 9600
        [[[runtimesettings]]]
            pubchannels = ToEmonCMS,
            read_interval = 10
            nodename = heatpump
            [[[[meters]]]]
                [[[[[electric1]]]]]
                    address = 1
                    registers = 1,3,5,97
                    names = V1,V2,V3,total_energy_imported
                    precision = 1,1,1,1
Modbus settings should be: parity = none and stopbit = 1.
EPBMETER1 Modbus register documentaion, add one to the last part of the address to get the modbodbus register number to use in emonhub. e.g total_energy_imported (kWh) has address 30096 therefore emonhub register is 97
Voltaris VDT45M
EmonHub can read from a Voltaris VDT45M three-phase electricity meter via modbus using the following config:
[[VDT45M]]
    Type = EmonHubMinimalModbusInterfacer
    [[[init_settings]]]
        device = /dev/ttyUSB0
        baud = 9600
    [[[runtime_settings]]]
        pubchannels = ToEmonCMS,
        read_interval = 10
        nodename = VDT45M
        # Modbus Unit ID (Factory default is 1)
        [[[[meters]]]]
          [[[[[electric1]]]]]
          address = 1
          # Use Function Code 04 for Input Registers
          function_code = 4
          # Registers (Converted from Hex to Decimal):
          # 0x00=0 (V1), 0x02=2 (V2), 0x04=4 (V3)
          # 0x06=6 (I1), 0x08=8 (I2), 0x0A=10 (I3)
          # 0x34=52 (Total P), 0x3E=62 (Total PF), 0x46=70 (Freq)
          # 0x48=72 (Import Energy), 0x4A=74
          registers = 0, 2, 4, 6, 8, 10, 52, 62, 70, 72, 74
          names = V1, V2, V3, I1, I2, I3, P_tot, PF, Freq, Import_kWh, Export_kWh
          datacodes = f, f, f, f, f, f, f, f, f, f, f
          scales = 1, 1, 1, 1, 1, 1, 1, 1, 1, 1, 1
          precision = 2, 2, 2, 3, 3, 3, 1, 3, 2, 2, 2
Register Documentation: http://downloads.spwales.com/tpdvo45m-modbus-protocol.pdf
Modbus Heat Meters
ZPmeter Heat Meter 223F
EmonHub can read from a ZPmeter Heat Meter 223F made by Hangzhou Zhongpei using the following config.
Note: The ZPmeter modbus interface requires 5V, this can be taken from RaspberryPi GPIO pin 2 or pin 4.
    [[ZPMETER]]
        Type = EmonHubMinimalModbusInterfacer
        [[[init_settings]]]
            #device = /dev/serial/by-id/usb-1a86_USB_Single_Serial_56D1092300-if00
            device = /dev/ttyACM*
            baud = 9600
            datatype = int
            parity = none
        [[[runtimesettings]]]
            pubchannels = ToEmonCMS,
            read_interval = 10
            nodename = zpmeter
            [[[[meters]]]]
                [[[[[heatmeter]]]]]
                     address = 7
                      registers = 1,3, 5, 7, 9, 15, 13,11,16,17,21
                      names = Energy, CoolEnergy, FlowT, ReturnT, dT, Power, FlowRate, Volume, 16unknown, runtime, Error
                      scales = 0.01,0.01,0.01,0.01,0.01,10,0.0001,0.01,1,1,1
                      units = kWh,kWh,C,C,C,W,m3/hr,m3
The default modbus ID for the Zpmeter we tested was 7. It’s unknown how to set the ID and it’s unknown if the ID is always 7.
The modbus ID was found using using this scan tool, this will scan from ID 1-247: mbpoll -a 1:247 -b 9600 -d 8 -P none -s 1 -m rtu /dev/ttyACM0
M-Bus Reader for Heat meters
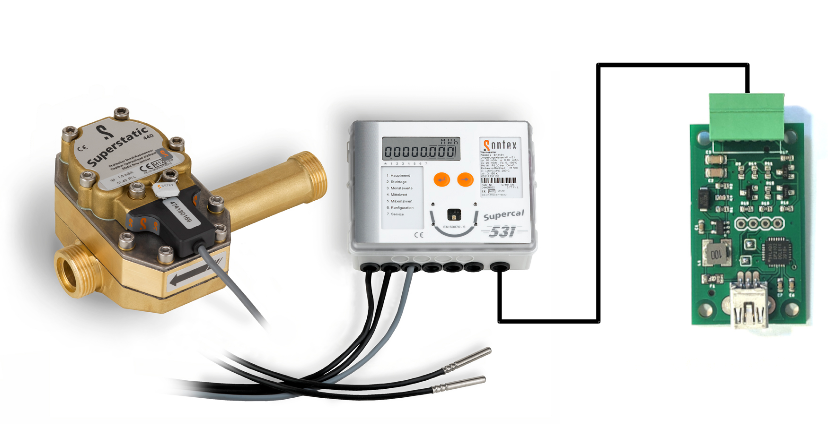
Many electricity and heat meters are available with meter bus (M-Bus) outputs. Using an M-Bus to USB converter, these can be read from an emonPi or emonBase. For heat pumps, this provides a convenient way of monitoring the heat output, flow temperature, return temperature, flow rate and cumulative heat energy provided by the system.
1. Connect up the USB to M-Bus converter to the M-Bus output of the meter and plug the converter into a USB port on either the emonPi or emonBase.
2. Login to the local copy of Emoncms running on the emonPi/emonBase and navigate to Setup > EmonHub. Click on ‘Edit Config’ and add the following config in the interfacers section to enable reading from the M-Bus meter:
baud: The M-Bus baud rate is typically 2400 or 4800. It is usually possible to check the baud rate of the meter using the meter configuration interface.
read_interval: Interval between readings in seconds.
List attached meters as shown in the example below.
address: The address of the meter is also usually possible to find and or set via the meter LCD configuration interface. If in doubt try 0 or 254. It’s also usually possible to set the ID by M-Bus interface Here is a script to check and set the address which has been tested to work on Kamstrup Multical 403 and Sontex 531.
type: Available options include: standard, qalcosonic_e3, sontex531, sdm120
Note: We’ve experienced reliability issues reading from the M-Bus version of the SDM120 electric meters. We recommend using the Modbus version with a seperate Modbus reader for more reliable results. For more information please see https://community.openenergymonitor.org/t/sdm120-mbus-meter-freezing-drop-out/20765/2.
Kamstrup Multical 403
[[MBUS]]
    Type = EmonHubMBUSInterfacer
    [[[init_settings]]]
        device = /dev/ttyAMA0
        baud = 2400
    [[[runtimesettings]]]
        pubchannels = ToEmonCMS,
        read_interval = 10
        validate_checksum = False
        nodename = MBUS
        [[[[meters]]]]
            [[[[[heatmeter]]]]]
                address = 1
                type = kamstrup403
Sontex 531
[[MBUS]]
    Type = EmonHubMBUSInterfacer
    [[[init_settings]]]
        device = /dev/ttyAMA0
        baud = 2400
    [[[runtimesettings]]]
        pubchannels = ToEmonCMS,
        read_interval = 10
        validate_checksum = False
        nodename = MBUS
        [[[[meters]]]]
            [[[[[heatmeter]]]]]
                address = 1
                type = sontex531
Sontex 789*
[[MBUS]]
    Type = EmonHubMBUSInterfacer
    [[[init_settings]]]
        device = /dev/ttyAMA0
        baud = 2400
    [[[runtimesettings]]]
        pubchannels = ToEmonCMS,
        read_interval = 10
        validate_checksum = False
        nodename = MBUS
        [[[[meters]]]]
            [[[[[heatmeter]]]]]
                address = 0
                type = standard
Extra Config for Sontex 789 & Supercal5
An additional step seems to be required to get these meters into the right mode. We have created a couple of scripts to help with this.
1. Stop emonhub
sudo systemctl stop emonhub
2. Try to read a data from from the Sontex using the usefulscripts/mbus/mbus_request_data_5b.py script:
python3 /opt/emoncms/modules/usefulscripts/mbus/mbus_app_reset.py       (maybe optional)
python3 /opt/emoncms/modules/usefulscripts/mbus/mbus_request_data_5b.py
This will likely not give the full page of data that we are after.
3. Try running usefulscripts/mbus/mbus_request_data_7b.py to switch modes:
python3 /opt/emoncms/modules/usefulscripts/mbus/mbus_request_data_7b.py
4. Try running usefulscripts/mbus/mbus_request_data_5b.py to switch modes again:
python3 /opt/emoncms/modules/usefulscripts/mbus/mbus_request_data_5b.py
The meter should now be in the right mode and returning the correct page of data.
5. Restart emonhub:
sudo systemctl restart emonhub
Look for data which includes Energy, Power, FlowT and ReturnT in the emonhub log.
The battery powered Sontex 789 receives power via the M-Bus reader, thefore battery will last indefinitely.
Qalcosonic E3
[[MBUS]]
    Type = EmonHubMBUSInterfacer
    [[[init_settings]]]
        device = /dev/ttyAMA0
        baud = 2400
    [[[runtimesettings]]]
        pubchannels = ToEmonCMS,
        read_interval = 10
        validate_checksum = False
        nodename = MBUS
        [[[[meters]]]]
            [[[[[heatmeter]]]]]
                address = 1
                type = qalcosonic_e3
Sharky 775
[[MBUS]]
    Type = EmonHubMBUSInterfacer
    [[[init_settings]]]
        device = /dev/ttyAMA0
        baud = 2400
    [[[runtimesettings]]]
        pubchannels = ToEmonCMS,
        read_interval = 10
        validate_checksum = False
        nodename = mbus
        [[[[meters]]]]
            [[[[[heatmeter]]]]]
                address = 25
                type = standard
Example heat meter data:
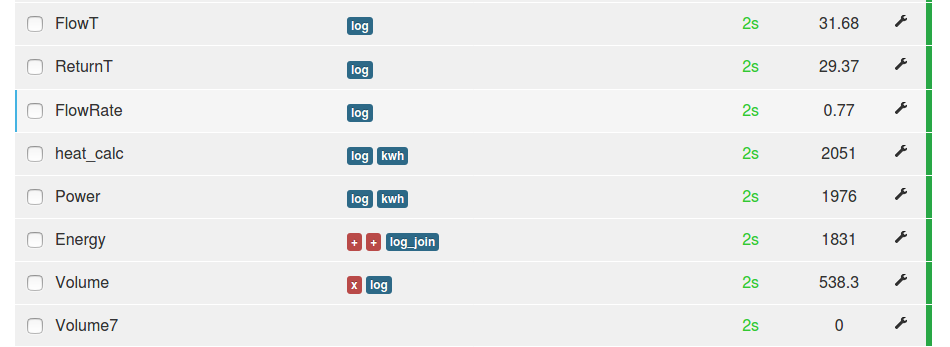
Tip: When logging the cumulative energy output (Energy) to a feed, use the ‘log to feed (join)’ input processor to create a feed that can work with the delta mode in graphs. This removes any data gaps and makes it possible for the graph to generate daily kWh data on the fly.
Direct DS18B20 temperature sensing
This EmonHub interfacer can be used to read directly from DS18B20 temperature sensors connected to the GPIO pins on the RaspberryPi. For direct connection of DS18B20 a 4k7 pull-up resistor is required.
At present a couple of manual setup steps are required to enable DS18B20 temperature sensing before using this EmonHub interfacer. These steps are pre-configured on emonSD / emonPi2.
Manual RaspberryPi configuration:
1. SSH into your RaspberryPi, open /boot/config.txt in an editor:
sudo nano /boot/config.txt
2. Add the following to the end of the file which will set the Pi to read DS28B20 on GPIO4:
dtoverlay=w1-gpio,gpiopin=4
Note: the default DS18B20 pin on the emonPi2 is 17
3. Exit and reboot the Pi
sudo reboot
4. SSH back in again and run the following to enable the required modules:
    sudo modprobe w1-gpio
    sudo modprobe w1-therm
Configuring the Interfacer:
Login to the local copy of Emoncms running on the emonPi/emonBase and navigate to Setup > EmonHub. Click on ‘Edit Config’ and add the following config in the interfacers section to enable reading from the temperature sensors.
read_interval: Interval between readings in seconds.
ids: This can be used to link specific sensors addresses to input names listed under the names property.
names: Names associated with sensor id’s, ordered by index.
Example DS18B20 EmonHub configuration:
[[DS18B20]]
    Type = EmonHubDS18B20Interfacer
    [[[init_settings]]]
    [[[runtimesettings]]]
        pubchannels = ToEmonCMS,
        read_interval = 10
        nodename = sensors
        # ids = 28-000008e2db06, 28-000009770529, 28-0000096a49b4
        # names = ambient, cyl_bot, cyl_top
Direct Pulse counting
This EmonHub interfacer can be used to read directly from pulse counter connected to a GPIO pin on the RaspberryPi.
pulse_pin: Pi GPIO pin number must be specified. Create a second interfacer for more than one pulse sensor
Rate_limit: The rate in seconds at which the interfacer will pass data to emonhub for sending on. Too short and pulses will be missed. Pulses are accumulated in this period.
nodeoffset: Default NodeID is 0. Use nodeoffset to set NodeID
Example Pulse counting EmonHub configuration:
[[pulse]]
    Type = EmonHubPulseCounterInterfacer
    [[[init_settings]]]
        pulse_pin = 15
        # bouncetime = 2
        # rate_limit = 2
    [[[runtimesettings]]]
        pubchannels = ToEmonCMS,
        nodeoffset = 3
Read State of charge of a Tesla Power Wall
This interfacer fetches the state of charge of a Tesla Power Wall on the local network. Enter your PowerWall IP-address or hostname in the URL section of the following emonhub.conf configuration:
[[PowerWall]]
    Type = EmonHubTeslaPowerWallInterfacer
    [[[init_settings]]]
    [[[runtimesettings]]]
        pubchannels = ToEmonCMS,
        name = powerwall
        url = http://POWERWALL-IP/api/system_status/soe
        readinterval = 10
Samsung ASHP

EmonHub (V2.3.4) can read data directly from a Samsung Air Souce Heat Pump (ASHP) or HVAC unit equipped with the Samsung Modbus Interface MIM-B19.
Example emonhub config:
[[SAMSUNG-ASHP-MIB19N]]
    Type = EmonHubMinimalModbusInterfacer
    [[[init_settings]]]
        device = /dev/ttyUSB0
        baud = 9600
        parity = even
        datatype = int
    [[[runtimesettings]]]
        pubchannels = ToEmonCMS,
        read_interval = 20
        nodename = samsung-ashp
        # prefix = sdm_
        [[[[meters]]]]
            [[[[[ashp]]]]]
                device_type = samsung
                address = 1
                registers = 75,74,72,65,66,68,52,59,58,2,79,87,5,89
                names = dhw_temp,dhw_target,dhw_status,return_temp,flow_temp,flow_target,heating_status,indoor_temp,indoor_target, defrost_status,away_status,flow_rate,outdoor_temp,3_way_valve
                scales = 0.1,0.1,1,0.1,0.1,0.1,1,0.1,0.1,1,1,0.1,0.1,1
                precision = 2,2,1,2,2,2,1,2,2,1,1,2,2,1
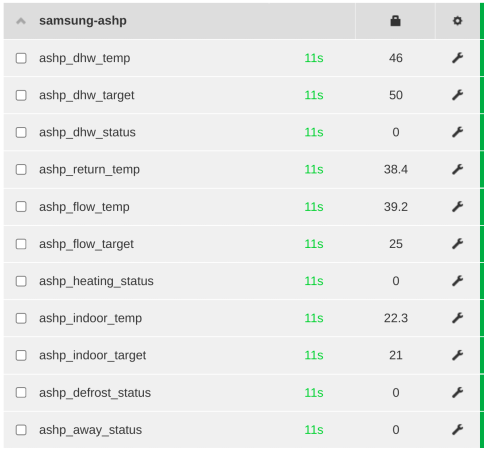
Example Samsung ASHP data in Emoncms:
EmonHub also makes this data available via MQTT emon/samsung-ashp
Modbus Renogy
See example config:
EmonHub Github: Renogy.emonhub.conf