Firmware
Updated: 14th May 2024
There are currently 8 pre-compiled firmware options for the emonTx4 available via both the Emoncms firmware upload tool and the command line emonupload.py firmware tool.
To choose the right firmware, there are 4 main questions:
Is the application 1-phase, 3-phase (4-wire) or current only?
Are you using a 6 channel expander for a total of 12 CT channels?
Do you require temperature sensing?
Do you require compatibility firmware that uses the JeeLib Classic radio format for use with an existing pre 2022 monitoring installation?
Select the right firmware from the list that matches the requirements of your application:
ID |
Firmware |
Voltage |
CTs |
Temperature |
Pulse |
|---|---|---|---|---|---|
Radio: LowPowerLabs |
|||||
1 |
emonTx4_DB_6CT_1phase_LPL |
1-ph |
6 |
0 |
1* |
2 |
emonTx4_DB_6CT_3phase_LPL |
3-ph |
6 |
0 |
1* |
3 |
emonTx4_DB_12CT_1phase_LPL |
1-ph |
12 |
0 |
3* |
4 |
emonTx4_DB_12CT_3phase_LPL |
3-ph |
12 |
0 |
3* |
5 |
emonTx4_CM_6CT_temperature_LPL |
1-ph or current only |
6 |
3 (6**) |
1 |
Radio: Compatibility mode (JeeLib Classic) |
|||||
6 |
emonTx4_DB_6CT_1phase_JeeLib_Classic |
1-ph |
6 |
0 |
1* |
7 |
emonTx4_DB_6CT_3phase_JeeLib_Classic |
3-ph |
6 |
0 |
1* |
8 |
emonTx4_CM_6CT_temperature_JeeLib_Classic |
1-ph or current only |
6 |
3 (6**) |
1 |
The pulse sensor * denote standard firmware radio packet support for the number of pulse sensors given. Firmware modification can extend the number of pulse sensors to 3 on all emonLibDB based firmwares.
All firmwares transmit data via 433Mhz RFM69CW radio by default and are designed to be used with a receiving emonPi/emonBase base-station. The radio can be turned off via serial configuration if reading data via USB cable.
All firmwares include serial configuration of radio, voltage and current channel calibration values.
_DB: EmonLibDB electricity monitoring library.
_CM: EmonLibCM electricity monitoring library.
3-phase firmwares phase allocation: follows the following pattern:
CT1: phase 1
CT2: phase 2
CT3: phase 3
CT4: phase 1
CT5: phase 2
CT6: phase 3
continued for 12 CT expansion board…
3-phase (4-wire): 3-phase support is for 3-phase, 4-wire systems only. That is systems with an L1, L2, L3 and a NEUTRAL wire. For 3-phase, 3-wire systems please contact us.
North American split-phase systems: The 3-phase voltage sensor can also be used to provide voltage measurement for North American split-phase systems. A custom phase allocation will likely be required for this configuration which can be achieved by minor firmware modification.
Current only: Supported by firmware 5 & 8 only, can be used with installations without an emonVs voltage sensor. These firmwares uses the older emonLibCM electricity monitoring library that has a fallback option to an assumed RMS voltage value if no AC voltage signal is detected.
Temperature sensing:
Supported by firmware 5 & 8 only. Temperature sensing support is achieved with a very slight degradation in electricity monitoring performance, see forum thread about this here.
**The default maximum number of temperature sensors that can be connected is 3 but this can be increased up to 6 by changing the
#define MAX_TEMPS 3value at the top of the firmware when compiling and uploading from source.
Pulse sensing is configured on the standard emonTx4 digital input port available on the RJ45 socket as well as the terminal block input (if the solder pad is configured).
Analog input: Reading from the analog input can be enabled for all firmware variants via a
#definecompile option when compiling from source.
Base firmwares
These are now built from a set of base firmware’s common to all AVR-DB hardware variants (emonTx4, emonTx5 and emonPi2) available in the avrdb_firmware repository
Firmwares 1, 2, 6 & 7 compiled from the
emon_DB_6CTbase firmware.Firmwares 3 & 4 are compiled from the
emon_DB_12CTbase firmware.Firmwares 5 & 8 are compiled from the
emon_CM_6CT_temperaturebase firmware.
Updating firmware using an emonPi/emonBase (recommended)
The easiest way of updating the emonTx4 firmware is to connect it to an emonBase with a USB cable and then use the firmware upload tool available at Setup > Admin > Update > Firmware.
Warning
System update may be required: If you don not see the latest firmware version as listed above in the firmware list a full system update is required first.
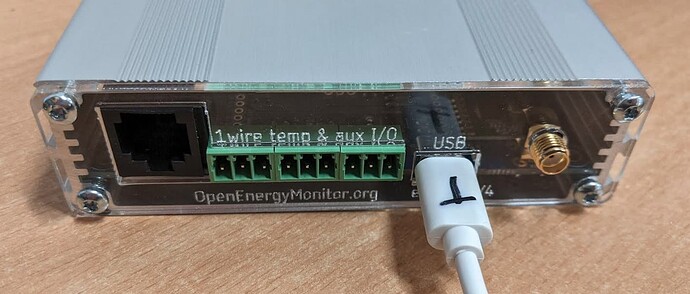
Note: Upload via USB-C will only work if connected in the right orientation. Try turning the USB-C connector around if upload fails. Some USB-C connectors have a smooth side on one side and jagged connection of the metal fold on the other. On the cables we have here, the smooth side should be facing up towards the top/front face of the emonTx4:

Refresh the update page after connecting the USB cable. You should now see port ttyUSB0 appear in the ‘Select port` list.

Double check the serial port, this is likely to be ‘ttyUSB0’ when plugged in via USB device connected. Select ‘emonTx4’ from hardware.
The standard radio format is ‘LowPowerLabs’, if you wish to use the emonTx4 with an existing system running JeeLib classic radio format you can select the JeeLib classic radio format here.
Upload pre-compiled using EmonScripts emonupload2 tool
On the emonPi/emonBase ensure EmonScripts is updated to latest version then run emonupload2 tool
/opt/openenergymonitor/EmonScripts/emonupload2.py
Select hardware then firmware version
Select hardware:
  1. emonTx5
  2. emonPi2
  3. emonTx4
  4. emonPi
  5. emonTx3
  6. rfm69pi
  7. rfm12pi
  8. emonTH2
  9. JeeLink
Enter number:3

Select firmware:
1. emonTx4_DB_6CT_1phase_LPL               2.1.0      (Standard LowPowerLabs)
2. emonTx4_DB_6CT_3phase_LPL               2.1.0      (Standard LowPowerLabs)
3. emonTx4_DB_12CT_1phase_LPL              1.2.0      (Standard LowPowerLabs)
4. emonTx4_DB_12CT_3phase_LPL              1.2.0      (Standard LowPowerLabs)
5. emonTx4_CM_6CT_temperature_LPL          1.6.0      (Standard LowPowerLabs)
6. emonTx4_DB_6CT_1phase_JeeLib_Classic    2.1.0      (Compatibility)
7. emonTx4_DB_6CT_3phase_JeeLib_Classic    2.1.0      (Compatibility)
8. emonTx4_CM_6CT_temperature_JeeLib_Classic1.6.0      (Compatibility)
emonupload2 tool can also be run on any other linux computer by cloning the EmonScripts repo then running the emonupload2.py python script. Python3 required
git clone https://github.com/openenergymonitor/EmonScripts
Upload pre-compiled manually using avrdude
Alternatively to upload the same pre-compiled firmware via command line on emonPi / emonBase:
avrdude -C/opt/openenergymonitor/EmonScripts/update/avrdude.conf -v -pavr128db48 -carduino -D -P/dev/ttyUSB0 -b115200 -Uflash:w:emonTx4_DB_6CT_1phase_LPL_v2_1_0.ino.hex:i
Or using different computer, ensure avrdude.conf has avr128db48 entry i.e DxCore see below instructions
avrdude -Cavrdude.conf -v -pavr128db48 -carduino -D -P/dev/ttyUSB0 -b115200 -Uflash:w:emonTx4_DB_6CT_1phase_LPL_v2_1_0.ino.hex:i
You will need avrdude installed (tested on version 6.3-2017) and the custom DxCore avrdude.conf. This can be downloaded here: DxCore avrdude.conf.
How to compile and upload firmware
Compile and Upload using PlatformIO
Clone the avrdb_firmware repo
git clone https://github.com/openenergymonitor/avrdb_firmware
cd avrdb_firmware/emon_DB_6CT
Open emon_DB_6CT.ino in an editor and change #define EMONTX5 to #define EMONTX4.
Change any other compile options as required e.g:
to use JeeLib classic radio format for compatibility with an existing installation change
#define RFM69_LOW_POWER_LABSto#define RFM69_JEELIB_CLASSIC.to enable analog read uncomment
#define ENABLE_ANALOG.change pulse pin to standard emonTx4 digital input if required
#define PULSE_PIN 1.
Install PlatformIO core then to compile and upload:
pio run -t upload
On first run PlatformIO will download automatically all the required libraries. You can also use the PlatformIO GUI.
Compile and Upload using Arduino IDE
If you don’t already have the Arduino IDE it can be downloaded from here:
https://www.arduino.cc/en/software
Once you have the IDE installed, you then need to install Spence Konde’s DxCore. This can be done by first pasting the following board manager URL in Arduino IDE > File > Preferences:
http://drazzy.com/package_drazzy.com_index.json
Then navigating to: Tools > Boards > Boards Manager, Select “DxCore by Spence Konde” and click Install.

For more information on DxCore installation see: https://github.com/SpenceKonde/DxCore/blob/master/Installation.md.
Libraries
Locate or create your Arduino Sketchbook directory (location found in Arduino preferences). If it doesnt already exist, create a directory called libraries in the Sketchbook directory and install the following libraries:
1. Download EmonLibCM library (avrdb branch)
https://github.com/openenergymonitor/EmonLibCM/tree/avrdb
2. Download EmonLibDB library (main branch)
https://github.com/openenergymonitor/emonLibDB
2. Download emonEProm library (avrdb branch)
https://github.com/openenergymonitor/emonEProm/tree/avrdb
3. Download RFM69_LPL library (main branch)
https://github.com/openenergymonitor/RFM69_LPL
4. Download RFM69_JeeLib library (avrdb branch)
https://github.com/openenergymonitor/RFM69_JeeLib/tree/avrdb
5. Download DxCore SpenceKonde OneWire library:
https://github.com/SpenceKonde/OneWire
Open and edit the AVR-DB firmware
Clone the avrdb_firmware repo
git clone https://github.com/openenergymonitor/avrdb_firmware
Open the base firmware that you wish to use in the Arduino IDE e.g emon_DB_6CT.ino.
Change #define EMONTX5 to #define EMONTX4.
Change any other compile options as required e.g:
to use JeeLib classic radio format for compatibility with an existing installation change
#define RFM69_LOW_POWER_LABSto#define RFM69_JEELIB_CLASSIC.to enable analog read uncomment
#define ENABLE_ANALOG.
Compilation settings:
With DxCore and the libraries installed the firmware should then compile.
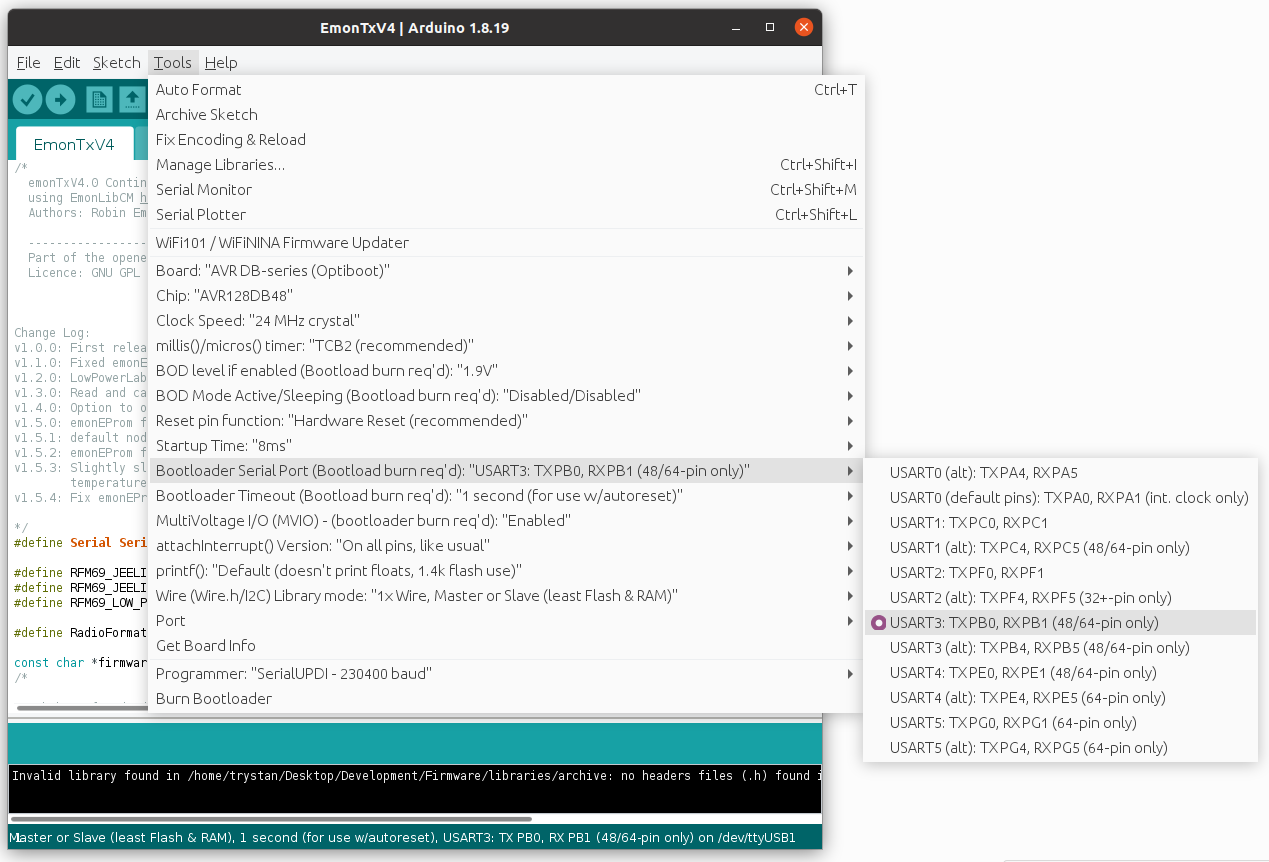
Under Tools, select the following configuration options:
Select Board “AVR DB-series (Optiboot)”
Select Chip: AVR128DB48
Clock Speed: 24 MHz Crystal
Bootloader serial port: UART3: TXPB0, RXPB1
Select Board “AVR DB-series (Optiboot)”

Select Chip: AVR128DB48

Bootloader serial port: UART3: TXPB0, RXPB1
EmonHub node decoders:
emonTx4_CM_6CT_temperature
3 temperature sensors:
[[17]]
    nodename = emonTx4_CM_17
    [[[rx]]]
        names = MSG, Vrms, P1, P2, P3, P4, P5, P6, E1, E2, E3, E4, E5, E6, T1, T2, T3, pulse
        datacodes = L,h, h,h,h,h,h,h, l,l,l,l,l,l, h,h,h,L
        scales = 1,0.01, 1,1,1,1,1,1, 1,1,1,1,1,1, 0.01,0.01,0.01,1
        units = n,V, W,W,W,W,W,W, Wh,Wh,Wh,Wh,Wh,Wh, C,C,C,p
4 temperature sensors:
[[17]]
    nodename = emonTx4_CM_17
    [[[rx]]]
        names = MSG, Vrms, P1, P2, P3, P4, P5, P6, E1, E2, E3, E4, E5, E6, T1, T2, T3, T4, pulse
        datacodes = L,h, h,h,h,h,h,h, l,l,l,l,l,l, h,h,h,h,L
        scales = 1,0.01, 1,1,1,1,1,1, 1,1,1,1,1,1, 0.01,0.01,0.01,0.01,1
        units = n,V, W,W,W,W,W,W, Wh,Wh,Wh,Wh,Wh,Wh, C,C,C,C,p
6 temperature sensors:
[[17]]
    nodename = emonTx4_CM_17
    [[[rx]]]
        names = MSG, Vrms, P1, P2, P3, P4, P5, P6, E1, E2, E3, E4, E5, E6, T1, T2, T3, T4, T5, T6, pulse
        datacodes = L,h, h,h,h,h,h,h, l,l,l,l,l,l, h,h,h,h,h,h, L
        scales = 1,0.01, 1,1,1,1,1,1, 1,1,1,1,1,1, 0.01,0.01,0.01,0.01,0.01,0.01,1
        units = n,V, W,W,W,W,W,W, Wh,Wh,Wh,Wh,Wh,Wh, C,C,C,C,C,C,p